Resurrect an old smartphone

Everyone of us has probably old smartphones somewhere and some of them would work with a reasonably current Android. My previous previous smartphone was a OnePlus 3, which has been sitting in the drawer for the past few years. I already unlocked it back in the days and installed LineageOS (Version 15.1 - Android 8.1). The current Version for the OnePlus 3 is LineageOS 18.1 (which is not the current Android, but good enough). An update from 15.1 to 18.1 without deleting everything on the phone is not easily possible so I will install 18.1 via recovery. The LineageOS website has a step by step guide which I only need half of because the phone is already unlocked.

Disclaimer: I am doing this with an old phone I had in a drawer for years. If you don't know what you are doing, don't ever do this with a phone you rely on.

I used adb on ArchLinux to sideload everything.

After starting the phone in fastboot mode, I checked if the device is found from my Linux PC:

$ fastboot devices
2b7f3166        fastboot

Yay.

Meanwhile: updating the radio/modem

I tried to install the new LineageOS version as described below, but the radio/modem was too old. So I needed to update this first.

First I installed the current version of twrp, because I already installed LineageOS recovery: Instructions and Download. Now install recovery (the phone needs to be in the bootloader):

$ fastboot flash recovery twrp-3.7.0_9-0-oneplus3.img
Sending 'recovery' (29821 KB)                      OKAY [  1.011s]
Writing 'recovery'                                 OKAY [  0.216s]
Finished. Total time: 1.271s

Next start the twrp mode by booting the phone into recovery.

I got the radio from the official OnePlus website included in the final update of OxygenOS 9: OnePlus3Oxygen_16_OTA_086_all_1911042118_997006918a894202.zip. Additionally I got the radio+modem from this xda-forum link. The files inside are the same, but without the boot image. So installing the xda-forum zip file via sideload updates only the relevant parts:

$ adb sideload Stable9.0.6\ Firmware+Modem_OnePlus3.zip
serving: 'Stable9.0.6 Firmware+Modem_OnePlus3.zip'  (~51%)    adb: failed to read command: Success

The message on the phone was that it was successful.

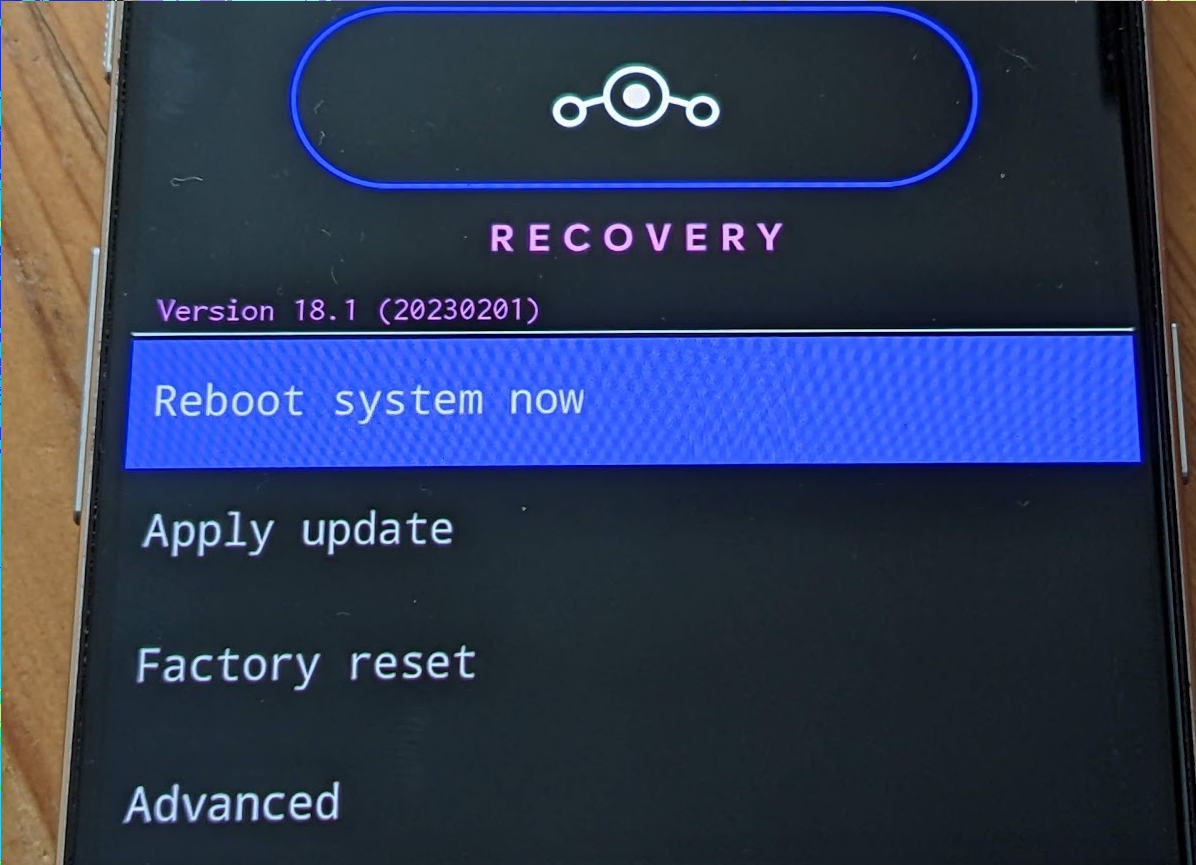
Updating to Android 11 (LineageOS 18.1)

Now back to the actual update.

Maybe I could use twrp for this too, but I wanted to use the LineageOS recovery image. I downloaded it from this page: https://download.lineageos.org/oneplus3

Flashed it:

$ fastboot flash recovery lineage-18.1-20230201-recovery-oneplus3.img
Sending 'recovery' (19361 KB)                      OKAY [  0.632s]
Writing 'recovery'                                 OKAY [  0.148s]
Finished. Total time: 0.827s

image of the phone in recovery start screen

For the next step I downloaded the correct LineageOS version for my phone: lineage-18.1-20230201-nightly-oneplus3-signed.zip. And the Google Apps package for Android 11.0 arm64: MindTheGapps-11.0.0-arm64-20220217_100228.zip.

In recovery then "Factory reset", then "Format data/factory reset". Be aware that everything on the phone will be deleted! For me this is a phone I haven't touched in years, so nothing relevant is on there.

Next step is "Apply update", "Apply from ADB". The instructions how to do this are on the phone screen:

$ adb sideload lineage-18.1-20230201-nightly-oneplus3-signed.zip
Total xfer: 1.00x

The radio/modem to old error was: "Modem firmware from OxygenOS 9.0.2 or newer stock ROMs is prerequisite to be compatible with this build." Now everything works, because the updated radio/modem already happened.

And next the Google apps:

$ adb sideload MindTheGapps-11.0.0-arm64-20220217_100228.zip
Total xfer: 1.00x

The signature is always invalid. So accepting this is "fine".

Now the phone can be rebooted and boots Android 11 (LineageOS 18.1). 🥳

Store data in Redis with Flask Async

For a future project idea I wanted to test how complicated Flask + Redis in Python async is. Redis-py got official async support with version 4.2.x and Flask has async support since version 2.0. Some additional libraries are needed to run this: asgiref and uvicorn.

First I needed a redis database to test this. I could have started a local docker container with redis, but I want to host this later on fly.io so I chose the free plan of the Redis Cloud (30MB are more than enough).

First we need a redis client that can process everything async:

import os
import json
import redis.asyncio as redis

class Store:
    def __init__(self):
        self.r = redis.from_url(os.environ.get("REDIS_URL"))

    async def save(self, name, state):
        return await self.r.set(f"game-{name}", json.dumps(state))

    async def load(self, name):
        game = await self.r.get(f"game-{name}")
        if game:
            return json.loads(game)
        return game

On save the game state, which is a dict, is stored as a json string in redis. If the key is found on load this is reversed, otherwise the "None" is returned.

Now the annotated main.py:

import uuid

from asgiref.wsgi import WsgiToAsgi
from flask import Flask, make_response, request

# store.py has the previous snippet
from .store import Store

wsgi_app = Flask(__name__)
store = Store()

@wsgi_app.route("/new")
async def new():
    name = str(uuid.uuid4()).split("-")[-1]
    user = request.cookies.get("user_id", str(uuid.uuid4()))
    state = {"name": name, "players": [user]}
    await store.save(name, state)

    resp = make_response(f"new game created: {name}<br/> you are: {user} (cookie set)")
    resp.set_cookie("user_id", user)
    return resp

@wsgi_app.route("/join/<name>")
async def join(name):
    state = await store.load(name)
    if state:
        user = request.cookies.get("user_id", str(uuid.uuid4()))
        if user not in state["players"]:
            state["players"].append(user)
        await store.save(name, state)

        resp = make_response(f"{name} found, players: {state['players']}")
        resp.set_cookie("user_id", user)
        return resp
    return "game not found"

@wsgi_app.route("/")
async def index():
    return "nothing to see"

app = WsgiToAsgi(wsgi_app)

A lot is happening here:

The wsgi_app is the "normal" Flask app. With WsgiToAsgi this can now run via uvicorn. For example like this: uvicorn main:app --reload. The REDIS_URL should be set before running (for a local docker setup this would be redis://localhost:6379). Without the asgi setup there is no async mainloop for the Redis store and the Flask app to share. This breaks pretty fast, so the whole app has to run in one asgi context.

The /new endpoint created a new "game" and adds the current user as player. The user-id is stored in a cookie and read when already set. To return a response with a cookie in it a response object is created via make_response. The current game name is the last part of a uuid4. In the "real" version I use a name generator that creates nicer names, i.e. "dark-red-deer-42". The /join/<name> endpoint adds the current user as player (if not already in the players list). This is only to demonstrate how endpoints like this would work.

What is missing: no error checking for the redis client! All the store.save() should be checked for returned values.

One final note, I run this on fly.io with a Procfile like this: web: uvicorn app.main:app --host=0.0.0.0 --port=8080

Experiment with DigitalOcean Functions

A few weeks ago I wrote about writing webhooks into Supabase tables. The fly.io app seems too much. A serverless version that is only run when needed feels a lot better. Supabase has something for that, but it only supports Typescript and I want to use Python.

So lets try DigitialOcean functions.

DO Functions have some caveats: no bring-your-own-domain support (so the url will stay ugly) and no option to run a real webframework (Flask, Django, Fastapi) as a function. They have their own solution for that: Apps. But without a free (serverless) plan. The functions have a free plan and that should be enough here.

First steps (using the cli) are:

  • Auth: doctl auth init

  • Install serverless: doctl serverless install

  • Connect to namespace (I created one in the UI before): doctl serverless connect

  • Copy project.yml.template to project.yml and set the 3 environment variables. This is to keep them out of the repository.

  • Deploy the app: doctl serverless deploy . --verbose-build

  • The function needs 512MB memory instead of the 256MB default! - This can be set in the DigitalOcean Functions UI for this function.

Development happens with one shell running and watching the logs: doctl serverless activations logs --follow

And in another shell the deployment (and curling) happens.

To test the function (but this does not have a valid signature to write the data into the database):

curl -X POST https://faas-fra1-XXXX.doserverless.co/api/v1/web/fn-AAAA-cd30-4430-b1cf-CCCC/ax-supabase/test \
--header "Content-Type: application/json" \
--data '{"id": "52ab6993-3f2e-46f7-b501-4fabdffa7178", "uid": "1001", "language": "en-GB", "collection_id": 1234,
"collection_name": "ax webhook example", "name": "Product 1001",
"text": "This is an example text for Product 1001.",
"text_modified": "2020-12-21T16:59:24.355771+00:00",
"html": "<p>This is an example text for Product 1001.</p>"}'

The real test is clicking on "generate" (or using the api) in the AX platform.

Challenges

The calculation of the signature is not so simple, because the function doesn't get the raw http call. The data fields given to the function are preprocessed and added as arguments. So the data structure has to be rebuild exactly in the way the AX platform does this. This may change and therefore break in the future.

Because everything is in the args given to the main method, all http attributes are in there, i.e. http method is in args.get("__ow_method"). To get the myax-signature the value is in args.get("__ow_headers").get("x-myax-signature") and is lowercased.

To install Python requirements, i.e. here supabase, a build.sh is needed that is called on deployment. The contents of my build.sh looks like this:

#!/bin/bash

set -e
virtualenv --without-pip virtualenv -p /usr/bin/python3.9
pip install supabase --target virtualenv/lib/python3.9/site-packages

This file has to be executable (a+x).

Conclusion

Overall the DigitalOcean Function does the same as the fly.io version, but without the need for an always running webapp. The code for this example is in this repository: https://github.com/mfa/ax-supabase-do.