Homeassistant and InfluxDB 2.x

I am pretty late in switching from my own handcrafted Flask/file-based solution to HomeAssistant. For this to replace my old solution some problems need to be solved and I will try to write about them in future blog posts. This post is about saving everything into InfluxDB 2.7 which was not as well documented as I hoped.

There are different ways to run HomeAssistant and I chose the systemd/virtualenv one. My host system is a shuttle PC with ArchLinux installed and systemd based services is what I run most. So InfluxDB is a systemd process too installed via pacman (influxdb and influxdb-cli). After that the documentation is vague, contains links to old (InfluxDB) documentation and is not helpful anymore. The ArchLinux package is InfluxDB is version 2.7.1 so the config cannot be based on version 1.7.x.

So the first thing after starting the influxdb service was running setup (on purpose interactive, to see options) to get a user, an org, a bucket and finally a token:

$ influx setup
> Welcome to InfluxDB 2.0!
? Please type your primary username hass
? Please type your password **************
? Please type your password again **************
? Please type your primary organization name hass
? Please type your primary bucket name home_assistant
? Please type your retention period in hours, or 0 for infinite 0
? Setup with these parameters?
  Username:          hass
  Organization:      hass
  Bucket:            home_assistant
  Retention Period:  infinite
 Yes
User    Organization    Bucket
hass    hass            home_assistant

We need to use the organization id and the bucket id later, so lets get them:

$ influx org list | grep hass
5f842d46302a9d7d        hass

$ influx bucket list | grep home_assistant
62302b4f139a4971        home_assistant  infinite        168h0m0s                5f842d46302a9d7d        implicit

And we need a token to read/write to the bucket:

$ influx auth create --org hass --write-bucket 62302b4f139a4971 --read-bucket 62302b4f139a4971
ID                      Description     Token          User Name       User ID                 Permissions
0bd0f47f9dae6000                        <TOKEN>        hass            0bd0f0b490ae6000        [read:orgs/5f842d46302a9d7d/buckets/62302b4f139a4971 write:orgs/5f842d46302a9d7d/buckets/62302b4f139a4971]

Add the token to secrets.yaml and create a influxdb.yaml in your configuration folder. Mine looks like this:

api_version: 2
ssl: false
host: localhost
port: 8086
token: !secret influxdb_token
organization: 5f842d46302a9d7d
bucket: home_assistant
exclude:
  entities:
    - zone.home
  domains:
    - persistent_notification
    - person

And the file is included in the configuration.yaml like this

influxdb: !include influxdb.yaml

After restarting homeassistant and waiting a bit I checked if there is data in influxdb using the API and some very minimal Flux.

curl --request POST "localhost:8086/api/v2/query?org=hass" --header "Authorization: Token <TOKEN>" --header "Content-Type: application/vnd.flux" --data 'from(bucket: "home_assistant") |> range(start: -5m)'

This returns datasets added to the home_assistant bucket in the last 5 minutes.
Static OSM Maps

For a website I am currently building I need static maps with a circle as marker. Most of this is already solved by Simon Willison with his shot-scraper tool and his full-screen leaflet site that is easy to screenshot.

For example using shot-scaper to get a shot of a location (without any markings):

# install shotscraper
pip install shot-scraper
# install browser to be used headless from shot-scraper
playwright install

# get a shot of a map in zoom level 18 with a square size
shot-scraper 'https://map.simonwillison.net/?center=48.74313004610327%2C9.076198339462282&zoom=16' \
  --width 500 --height 500 --wait 3000
The result looks like this:

openstreetmap shot with a dam in the middle

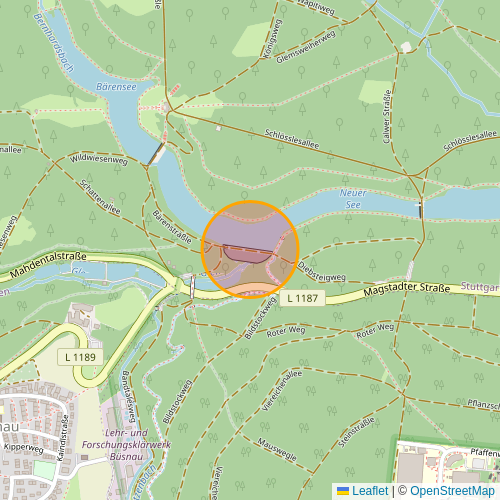
But I want a colored circle at the center of the map to highlight the element there. I tried the markers that are already implemented by Simon, but they disturb the actual object too much. To fix this I forked the repo and added a radius option. When the radius is set a circle with light background is added to the map. No option to select the color or the background. But the code is easy enough to change.

Now we use this fork on localhost and take a screenshot:

git clone https://github.com/mfa/url-map
cd url-map
# run a webserver on port 8000 serving the index.html in the repo
python -m http.server

# get a shot of the local site -- needs requirements from before!
shot-scraper 'http://localhost:8000/?center=48.75685363373798%2C9.09496307373047&zoom=15&radius=150' \
  --width 500 --height 500 --wait 3000

openstreetmap shot with a dam in the middle marked with a circle

Single Point Elevation

How to get the elevation of a latitude/longitude point on the planet? The Google Api costs money. The stadiamaps version is only in the paid plan too. So what is the alternative?

There is open-elevation and it is opensource. So lets try to run this ourselves. The whole setup needs some memory (4GB), CPU and disk space (40G) so I used a Hetzner VPC to run it. I used the smallest possible VPC for the problem (a CPX21, 4GB memory, 80G disk) that costs 1.4 cent per hour. The image I used is the "Docker CE" app (based on Ubuntu 22.04), because we mainly need Docker. The server needs an IPv4 address to communicate with Github and cgiar.org.

Open-elevation has a howto for self hosting. We try to follow this step by step with minor modifications. The first modification is by using a fork that has fixed the moving of the extracted archives. The elevation data is downloaded from https://srtm.csi.cgiar.org automatically and is about 2G of data. The disk space needed is about 40G (20G when finished extraction and processing). The second modification is the change of the -v option to the current folder and not only data. It didn't work otherwise, but your mileage may vary.

I used the default root user for all of this because I only needed the setup to process a list of geo points. When using this to host a public version I would have created a user. Another thing I am ignoring is SSL – so no https.

There is no progressbar after download and extraction for the tile creation. And this takes a few minutes.

Command log:

# using the fork, not the original
git clone https://github.com/CelticJasen/open-elevation
cd open-elevation
mkdir data
# download and process the tiles
docker run -t -i -v $(pwd):/code openelevation/open-elevation /code/create-dataset.sh
# running the webservice
docker run -t -i -v $(pwd):/code -p 80:8080 openelevation/open-elevation

Next we try to use the API and query a single point to test the accuracy: The height of the Feldberg which is the highest mountain in the black forest with 1493 meters.

curl http://<IP-ADDRESS-OF-YOUR-SERVER>/api/v1/lookup?locations=47.8739912,8.0046735
# {"results": [{"latitude": 47.8739912, "longitude": 8.0046735, "elevation": 1490}]}

The result is close enough.

Finally processing a list of points within one api call:

curl -X POST http://<IP-ADDRESS-OF-YOUR-SERVER>/api/v1/lookup --header "Content-Type: application/json" \
--data '{"locations": [{"latitude": 52.37313,"longitude": 4.89135},{"latitude": 59.32687,"longitude": 18.07035}]}'
# {"results": [{"latitude": 52.37313, "longitude": 4.89135, "elevation": 14}, {"latitude": 59.32687, "longitude": 18.07035, "elevation": 28}]}%
Both points are in cities near the coast, so the values are as expected.
I used this API for a few thousand points and the response time was near instant.
This thing is fast and the results are close enough for probably most usecases.