Add more RaspberryPI Sensors to Homeassistant

Currently I have 7 RaspberryPIs deployed. Most of them have have a BME280 sensor and some have additionally different sensors. For my future self I want to have instructions on how to reinstall everything. The first step was the Packer-Ansible setup described in the previous blogpost to get a ready to use base system with wifi, vpn and some base settings. This is the next step by starting a git repo with sensors that I use to push to Homeassistant.

For example the most common sensor I use: the BME280. To use this on a PI the sensor needs to be connected to the I2C pins and I2C needs to be activated on the RaspberryPI (i.e. by using raspi-config). The Python package I use is RPi.bme280 and the code to push looks like this:

#!/usr/bin/python

import requests
import smbus2
import bme280

from pathlib import Path

def push(data, secret):
    r = requests.post(
        f"http://192.168.0.99:8123/api/webhook/{secret}",
        json={
            "temperature": round(data["temperature"], 1),
            "pressure": int(data["pressure"]),
            "humidity": int(data["humidity"]),
        },
    )
    assert r.status_code == 200

# copy webhook secret into file .secret
secret = (Path(__file__).parent / ".secret").open().read().strip()

address = 0x76
bus = smbus2.SMBus(1)
bme280.load_calibration_params(bus, address)
sensor = bme280.sample(bus, address)

push({
    "temperature": sensor.temperature,
    "pressure": sensor.pressure,
    "humidity": sensor.humidity,
}, secret)

The secret in the file .secret is the webhook_id used in homeassistant. There is no additional security to knowing this webhook_id.

The homeassistant config looks like this:

template:
  - trigger:
      - platform: webhook
        webhook_id: !secret zero6-bme
        allowed_methods:
          - POST
        local_only: false
    unique_id: "zero6"
    sensor:
      - name: "zero6 Temperature"
        state: "{{ trigger.json.temperature }}"
        unit_of_measurement: "°C"
        device_class: temperature
        unique_id: "zero6_temperature"
      - name: "zero6 Humidity"
        state: "{{ trigger.json.humidity }}"
        unit_of_measurement: "%"
        device_class: humidity
        unique_id: "zero6_humidity"
      - name: "zero6 Pressure"
        state: "{{ trigger.json.pressure }}"
        unit_of_measurement: "hPa"
        device_class: atmospheric_pressure
        unique_id: "zero6_pressure"

The other sensors added to the Repository are: SCD30, BME680, BH1750, BMP180 and ADS1015. Every sensor has a push.py script and a readme howto install the packages needed. Everything is documented in https://github.com/mfa/ha-sensors.

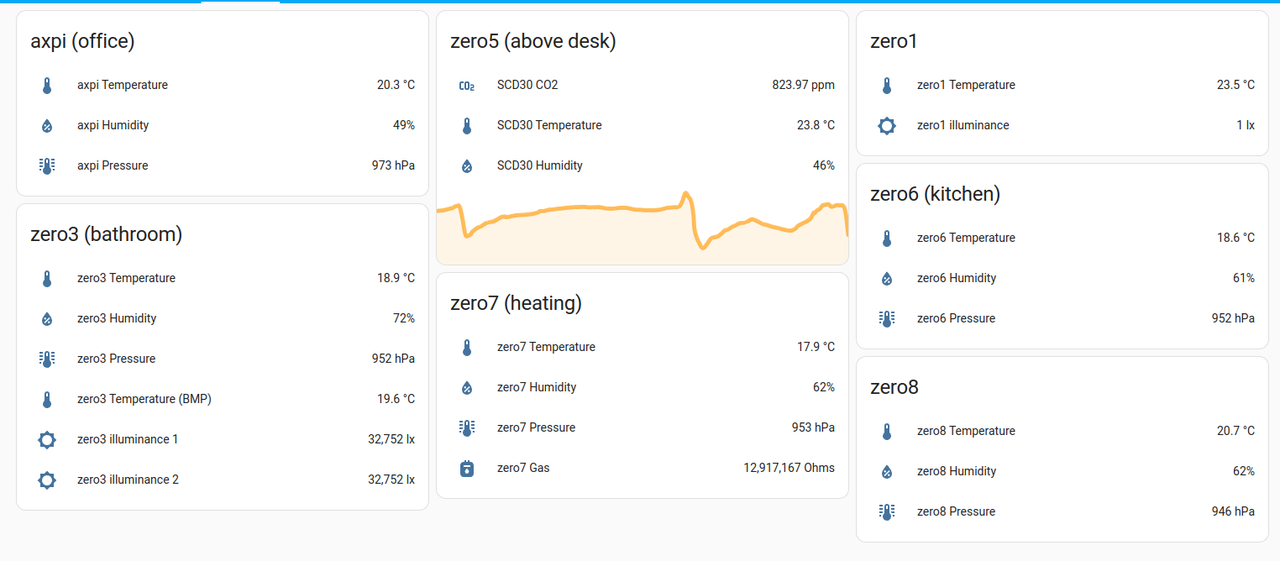
Screenshot of some of the sensors in my homeassistant dashboard:

img1

Automatically build Raspberry PIs using Ansible

I started to build Raspberry PI images automatically using packer-builder-arm. This combined with Ansible is very reproducible tooling to automatically build images for only slightly different RaspberryPIs.

I need to automatically add a SSH key for the pi user, a wpa_supplicant config and a Tinc setup with the private key for exactly this PI.

But first I want to see if everything is good without flashing the PI every time. This can be done by mounting the image. To find out which sector is the start sector we can use fdisk like this:

$ fdisk -l raspios-arm.img

Disk raspios-arm.img: 4 GiB, 4294967296 bytes, 8388608 sectors
Units: sectors of 1 * 512 = 512 bytes
Sector size (logical/physical): 512 bytes / 512 bytes
I/O size (minimum/optimal): 512 bytes / 512 bytes
Disklabel type: dos
Disk identifier: 0x8acef004

Device           Boot  Start     End Sectors  Size Id Type
raspios-arm.img1        8192  532479  524288  256M  c W95 FAT32 (LBA)
raspios-arm.img2      532480 8388607 7856128  3.7G 83 Linux

The start sector of the root partition is 532480 multiplied with the sector size of 512 bytes. So to mount the root partition we can run this:

mkdir -p root
sudo mount raspios-arm.img -o loop,offset=$(( 512 * 532480 )) root/

But now to the Ansible setup. I use this to setup Rasperry PIs and add then the actual sensor and scripts manually. The important parts for me are Wifi, SSH and (Tinc) VPN, so that I can login when they are deployed. To store this setup in a public repository, for others to see, I use Ansible Vault a lot.

The ssh playbook adds the ssh key and activates the service. Nobody needs to know the key I use for my PIs so the key is stored encrypted.

ssh.yaml:

---
- name: ssh keys
  ansible.posix.authorized_key:
    user: pi
    exclusive: true
    key: !vault |
          $ANSIBLE_VAULT;1.1;AES256
          39626231646331333861393737303430396164303565373538626338346136303263316639303465
          3161346235626331323961666637323335383536363136300a396537663234643863363531623931
          39633665613232636637393932663063636165343466393262303137643266656532613761346236
          3963393766373632340a363162656365306332623630393665333539336134376534633434363635
          35323331363565663837333635363663656338353836613236343663333736666339356138303665
          35383239666131393635653563643137343461636435356165386164353635393766636432346566
          30313663653263303563643262643165356563386365313261663961313832303866393438326162
          64333036663631303531346239303162303837326466616634333530633438363063363934303762
          66346465323839643766343737323038386364633032663833303565323763316632
- name: Enable ssh service
  ansible.builtin.systemd:
    name: ssh
    enabled: true

Creating the "key" entry could be done like this:

cat ~/.ssh/id_ed25519.pub | ansible-vault encrypt_string --vault-password-file ansible/.vault_pass.txt --stdin-name 'key'

The other setups for WiFi and Tinc are similar. Tinc needs a few files to be generated so I used templates for them with a few variables from Ansible Vault. Differences between the PIs are stored in a variables file for each PI. Additionally a common.yaml with the variables that are shared.

My current setup is in a public repository and I will add more of my PIs in the following weeks.

Automate Compute on Hetzner

Currently I am experimenting with automatic building of Raspberry PI images and the building process with qemu and packer is cooking my notebook. So why does this have to run on my notebook? Because my notebook is the fastest compute I currently have. But why not use a cloud server for that? Of course I could use an AWS EC2 instance or a Google Cloud Compute server, but I wanted to try to automate a Hetzner VPS.

Prerequisite

I used hcloud and installed it using the ArchLinux package. To run the commands we need a token which can be created in your Hetzer project website. For this I also created a new project because I don't want to have a token lying around that can kill my productive servers.

Setup of the hcloud environment:

# setup the project, this will ask for the token, "compute" is the name of the local project
hcloud context create compute

# add ssh-key
hcloud ssh-key create --name ssh-key --public-key-from-file ~/.ssh/id_ed25519.pub

Run a compute job on a new server

The structure I use here is a job folder is synced over to the server after creation and a job.sh is run. The result is then expected to be in a result folder and is synced back before the server is deleted. The job is run as root because it would need root priviledges either way.

An example job.sh may look like this:

# install docker
curl -fsSL https://get.docker.com -o get-docker.sh
sh ./get-docker.sh

# run the actual job
cd /root/job/
docker build --tag packer-qemu-build .
docker run --rm --privileged -v /dev:/dev -v .:/build packer-qemu-build build packer.json

# copy results
mkdir ~/result
mv raspberry-pi.img ~/result

The script that creates the server, runs the job, and deletes the server:

#!/bin/bash

# create the server; choose server size by selecting a type
hcloud server create --name compute1 --image debian-12 --type cpx11 --ssh-key ssh-key
IP=$(hcloud server ip compute1)

# add/update key in known_hosts
ssh-keygen -R ${IP}

# wait until ssh login works; and add the ssh key to known hosts
until ssh -o StrictHostKeyChecking=accept-new root@${IP} true >/dev/null 2>&1; do
    echo -n "."
    sleep 1
done

# copy job folder to server
rsync -az job root@${IP}:.

# run script on server
ssh root@${IP} "bash job/job.sh"

# download result folder
rsync -azvP root@${IP}:result .

# we are done, delete server
hcloud server delete compute1

There are different types of Hetzner servers, run hcloud server-type list to see them. For me 2 cores and 2GB seemed enough here. Parallel execution happens only for a short time but this seems faster than the single cpu CX11 type. I chose Debian 12 because I know that docker will run without any problems. Of course this is probably the case for any Linux, but I didn't feel like experiments are needed here.

The cost for all of this is a few cents per hour. For me this is worth it to not heat up my notebook.

The downside of running a job this way is, that it is not headless. Your shell needs to stay open while this runs. This could be improved with a tmux but I had no interruption while using this the last 2 days so no need to figure that out.