Running Redis on Raspberry PI Zeros

In the past months I replaced a lot of Raspberry Pi Zero Ws with Raspberry Picos running ESPHome. What could I use these extra Zeros for now? For another ongoing project I need a Redis as broker in my local network. I could use one of the Zeros for that, but are they fast enough?

First we need Docker to run the armv6 version of Redis. To install Docker I chose the convenience solution which when looking at the script is doing the same as the manual version above on the same site.

Install Docker:

curl -fsSL https://get.docker.com -o get-docker.sh
sudo sh get-docker.sh

To simplify the Docker command, we use Docker Compose and change the command to actually store data on disk, add a volume and expose the Redis port.

services:
  redis:
    image: redis:7-alpine
    ports:
      - '6379:6379'
    command: redis-server --save 60 1 --loglevel warning --requirepass some-password
    volumes:
      - /home/pi/redis-data:/data

Finally start the container:

mkdir /home/pi/redis-data
sudo docker compose up -d

I setup this on two Raspberry Pi Zero Ws and one Raspberry Pi Zero 2W to compare to. The actual benchmark was run on my notebook in the same network:

docker run --rm redis redis-benchmark -h <IPADRESS> -a some-password -t set,get -r 10000 -n 100000 -q

The settings are: Only test "set" and "get" and use 10000 different random keys and not use only one key. Do this 100000 times.

Runs:

run

Raspberry

SET

GET

1st run

Zero W A

SET: 680.38 requests per second, p50=66.495 msec

GET: 692.57 requests per second, p50=65.119 msec

2nd run

Zero W A

SET: 716.61 requests per second, p50=67.647 msec

GET: 724.76 requests per second, p50=66.815 msec

3rd run

zero W A

SET: 710.87 requests per second, p50=67.519 msec

GET: 724.68 requests per second, p50=66.751 msec

1st run

zero W B

SET: 723.24 requests per second, p50=65.855 msec

GET: 730.49 requests per second, p50=64.959 msec

2nd run

zero W B

SET: 703.07 requests per second, p50=68.607 msec

GET: 719.88 requests per second, p50=67.711 msec

1st run

zero 2W

SET: 4020.59 requests per second, p50=11.319 msec

GET: 4209.99 requests per second, p50=11.287 msec

2nd run

zero 2W

SET: 4068.68 requests per second, p50=11.231 msec

GET: 4254.41 requests per second, p50=11.231 msec


CPU on the Zero 1Ws is between 30% and 40% for the Redis process while the benchmark is happening. The Zero 2W is around 40% CPU too, but it is using all 4 CPUs. As seen in the benchmark the Zero 2W is more than 5x faster than the Zero 1W. I still plan to use a spare Zero 1W for Redis. When the performance is not enough I still can replace it with a Zero 2W.
ESPHome: CO2 Sensors

I am using an SCD30 connected to a Raspberry PI Zero W to send CO2 measurements every 2 seconds to my Homeassistant. The current value of the SCD30 together with the difference of the last minute is shown in my statusbar, see a previous blog post about this.

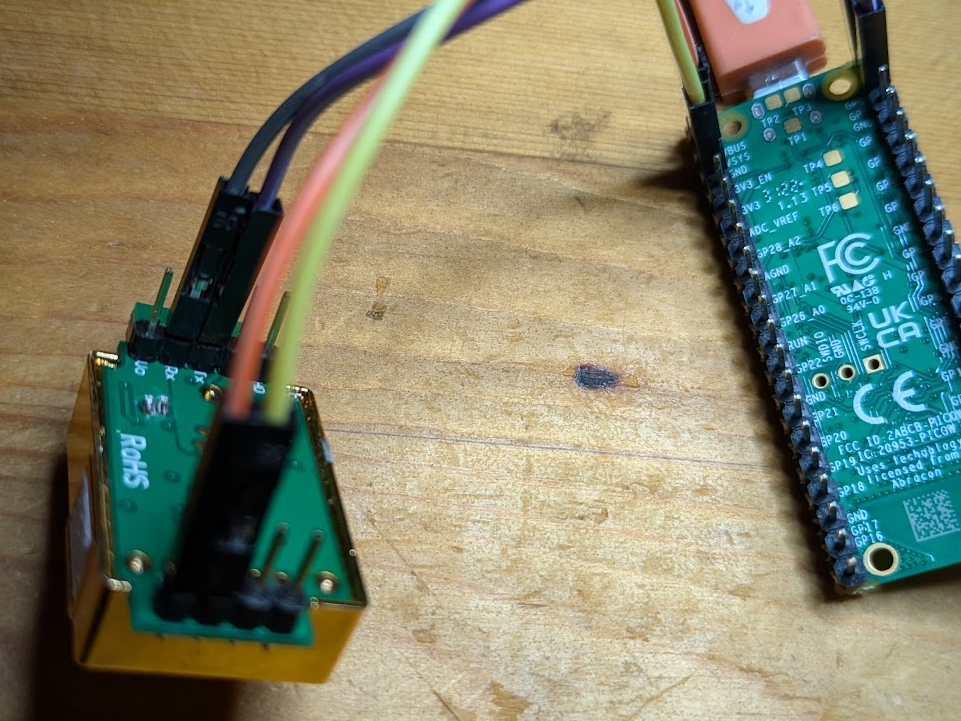
But before I migrate the SCD30 to ESPHome I want to try a MH-Z19B I have bought a while ago and never used. First I soldered pins on the sensor and connected them to a Raspberry PI Pico W. For this I used Pins GP0 and GP1 to connect to RX/TX of the sensor. There are a lot of alternative UART pins on the Pico. A common alternative here would be GP21/GP22. The sensor needs 4.5~5.5 V DC so connect to 5V and of course connect GND.

The wiring setup looks like this:

img1

My ESPHome config (ESPHome reference for MHZ19):

uart:
  tx_pin: 0
  rx_pin: 1
  baud_rate: 9600

sensor:
  - platform: mhz19
    co2:
      name: MH-Z19 CO2 Value
    temperature:
      name: MH-Z19 Temperature

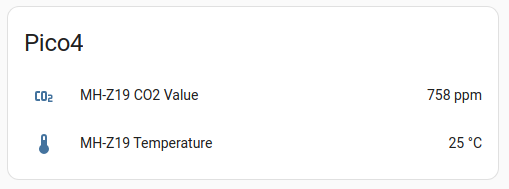
When booting the sensor is warming up and after this we get CO2 values and temperature:

[20:02:29][W][mhz19:035]: MHZ19 warming up, 30s left
[20:03:29][W][component:170]: Component mhz19.sensor cleared Warning flag
[20:03:29][D][mhz19:065]: MHZ19 Received CO₂=756ppm Temperature=23°C Status=0x00
[20:03:29][D][sensor:093]: 'MH-Z19 CO2 Value': Sending state 756.00000 ppm with 0 decimals of accuracy
[20:03:29][D][sensor:093]: 'MH-Z19 Temperature': Sending state 23.00000 °C with 0 decimals of accuracy

On the Homeassistant dashboard the sensor works as expected:

img2

Next the SCD30, which has a lot better accuracy, but costs more than twice as much. The sensor uses I2C which we used before for a BME280. We connect the SCD30 to GP0/GP1 (the same pins as for UART for the MHZ19). Important here is to connect SDA to GP0 and SCL to GP1 and not crosswise as for RX/TX.

Addionally I added a BME280 the same way my Raspberry PI Zero had used before. Because we have two devices that use I2C but can only specify one pin pair per bus we use the second bus for the BME280. We connected the BME280 to GP26 and GP27 for SDA and SCL and for power to the 3.3V pin.

My ESPHome config for the SCD30 (ESPHome reference) and a BME280:

i2c:
  - id: bus0
    sda: 0
    scl: 1
  - id: bus1
    sda: 26
    scl: 27

sensor:
  - platform: scd30
    i2c_id: bus0
    co2:
      name: "Desk CO2"
      accuracy_decimals: 1
    temperature:
      name: "Desk Temperature"
      accuracy_decimals: 2
    humidity:
      name: "Desk Humidity"
      accuracy_decimals: 1
    address: 0x61
    update_interval: 2s
  - platform: bme280_i2c
    i2c_id: bus1
    temperature:
      name: "Desk BME280 Temperature"
    pressure:
      name: "Desk BME280 Pressure"
    humidity:
      name: "Desk BME280 Humidity"
    address: 0x76
    update_interval: 60s

Bootup is a lot faster and there is no initialization wait for the CO2 sensor:

[20:53:29][D][scd30:186]: Got CO2=962.24ppm temperature=25.13°C humidity=50.12%
[20:53:29][D][sensor:093]: 'Desk CO2': Sending state 962.23608 ppm with 1 decimals of accuracy
[20:53:29][D][sensor:093]: 'Desk Temperature': Sending state 25.13084 °C with 2 decimals of accuracy
[20:53:29][D][sensor:093]: 'Desk Humidity': Sending state 50.12207 % with 1 decimals of accuracy
[20:53:34][D][sensor:093]: 'Desk BME280 Temperature': Sending state 22.73586 °C with 1 decimals of accuracy
[20:53:34][D][sensor:093]: 'Desk BME280 Pressure': Sending state 959.16943 hPa with 1 decimals of accuracy
[20:53:34][D][sensor:093]: 'Desk BME280 Humidity': Sending state 53.44043 % with 1 decimals of accuracy

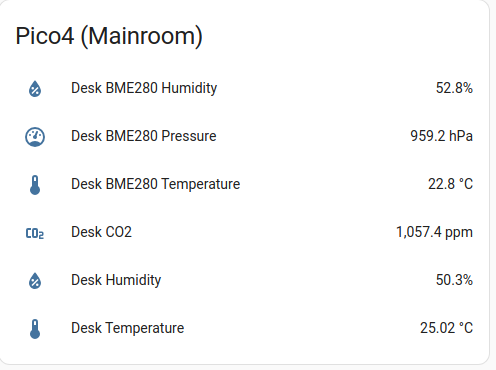
In Homeassistant the card looks like this:

img3

The temperature of the SCD30 is a bit off. This can be corrected with the temperature_offset parameter in the sensor config. But because I have an additional BME280, I don't care about the offset.

Positives of migrating the SCD30 to ESPHome: one Raspberry Pi Zero shut off (no OS updates anymore, less power consumption for a Pico than for a Zero). Addionally I can update the Pico via OTA every few months with probably less issues.

ESPHome: Over The Air Update

At the beginning of 2024 I started using ESPHome to replace Raspberry PI Pico Ws and wrote about it. Then I didn't activate OTA update because I didn't know about it and all the Picos I deployed then are now a bit outdated.

Before changing anything or compiling a firmware we need to update the ESPHome Docker image. This felt a bit strange, because pulling a new image wasn't enough, so I deleted the some generated folders, too.

# update esphome, to get the current firmware code
docker pull esphome/esphome
# delete some cached folders to redownload platformio and guarantee a new compile
sudo rm -rf .esphome/build/pico2 .esphome/platformio

Next is to add ota to the config (best with a password defined in secrets.yaml).

ota:
  password: !secret ota_password
The other change I needed was platform: bme280 is named platform: bme280_i2c because this changed in the new ESPHome firmware.
After changing the configuration we compile a new firmware which creates a firmware.uf2 because it is a Raspberry PI Pico.
For me this worked like this:
docker compose run --rm esphome compile pico2.yaml
# mount the Pico before by pressing the button when plugging into the notebook
cp config/.esphome/build/pico2/.pioenvs/pico2/firmware.uf2 /run/media/mfa/RPI-RP2/

When bootet after this we can now update the Pico via OTA and don't need to plug it in again (hopefully ever). The update via OTA for my Pico using docker compose:

docker compose run --rm esphome run pico2.yaml

Because the Pico is not connected to my notebook (anymore) there is only the OTA option and it will update the Pico via OTA automatically. Running the command is very verbose and you see success and the following logs when the Pico is booting again:

<...>
INFO Upload took 4.52 seconds, waiting for result...
INFO OTA successful
INFO Successfully uploaded program.
INFO Starting log output from pico2.local using esphome API
<...>
[22:49:27][I][app:100]: ESPHome version 2024.5.3 compiled on <...>

In the log output I see the device has booted and is measuring using a BME280 as expected.

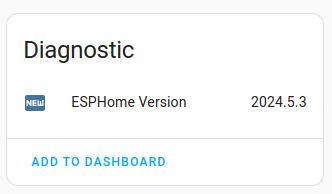
Because we can update the Pico now very easy we can add a new sensor that adds the current version as text sensor. The firmware version is already shown in the ESPHome Integration, but with an Entity we can add a reminder for outdated versions to our Dashboards. Adding a firmware version text_sensor is already an example in the documentation, so we add this to the config:

text_sensor:
  - platform: version
    name: "ESPHome Version"
    hide_timestamp: true

Compile and run as described above and we will get a new sensor in Homeassistant:

img1

Activating OTA is absolutely worth it. A Pico (or ESP32) can stay in place where ever it is deployed and still gets a new firmware or new settings.