ESPHome: OLED Display
For my kitchen I want a display with the current temperature and humidity based on the Pico I already have deployed there. I get the current time, temperature and humidity from Homeassistant. If the same Pico is displaying the values of it's own sensors, fetching them again via Homeassistant is not needed.
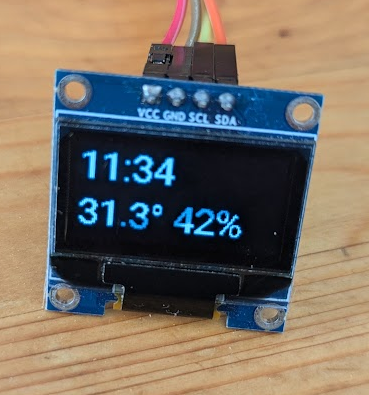
I used a 128x64 I2C OLED display. The result looks like this:

Some notes about the code below:
The Pico needs WiFi and an API to communicate with Homeassistant.
I disabled all logs that are not Errors because the display is spamming that it is too slow.
The Timezone of my local system is set to UTC, so I need to set it here to get the correct time on the display.
On the display I want to show temperature and humidity from a different Pico so the data is fetched from Homeassistant with their entity_ids.
Add
internal: trueto sensors you fetch from Homeassistant to not republish them.For TTF fonts I didn't want to copy files around, so I used a Google Font that is fetched at buildtime.
I used Pin 1+2 from the Pico for I2C.
The default update_interval of the display is 1 second -- I changed it to 5 seconds.
The Code in the display lambda is C++. So be aware of semicolons and format strings.
Updating via OTA is still the best way to update a Pico (after the initial U2F file is copied to the device).
ESPHome config for my kitchen display (only the display, no attached sensors)
esphome:
  name: pico5

rp2040:
  board: rpipicow
  framework:
    platform_version: https://github.com/maxgerhardt/platform-raspberrypi.git

api:
  password: ""

wifi:
  ssid: !secret wifi_ssid
  password: !secret wifi_password

logger:
  logs:
    # disable log entries about the display updating too slow
    component: ERROR

time:
  - platform: homeassistant
    id: esptime
    timezone: Europe/Berlin

sensor:
  - platform: homeassistant
    id: temperature
    entity_id: sensor.pico2_bme280_temperature
    internal: true

  - platform: homeassistant
    id: humidity
    entity_id: sensor.pico2_bme280_humidity
    internal: true

font:
  - file: "gfonts://Roboto"
    id: font1
    size: 24

i2c:
  sda: 0
  scl: 1
  scan: false

display:
  - platform: ssd1306_i2c
    model: "SH1106 128x64"
    address: 0x3C
    update_interval: 5s
    lambda: |-
      it.strftime(0, 0, id(font1), "%H:%M", id(esptime).now());
      if (id(temperature).has_state()) {
        it.printf(0, 31, id(font1), "%.1f°", id(temperature).state);
      }
      if (id(humidity).has_state()) {
        it.printf(60, 31, id(font1), "%d%%", int(id(humidity).state));
      }

ota:
  platform: esphome
  password: !secret ota_password
I will merge the display into the Pico2 (the one with the sensor) and only run one device in the kitchen. But for development the decoupling via Homeassistant was very convenient. To get the current time the Homeassistant is always needed.


