Process and Review thousands of Images

Six years ago I started to take a picture of a Minol heat usage meter every hour automatically with a Raspberry PI Zero. I wrote about the find and crop procedure and the processing of a folder back then. Additionally I build a prototype to recognize the digits on the display using a CNN, but I never finished and polished the code. This summer it feels like it is time to either automate everything or abandon the project.

Before I can retrain the CNN I need to preprocess all the photos the PI automatically collected over the years. Over 50k photos were shot and the first step is to see if the cropping is still working. Of course the position of the camera changed a bit every time I moved the couch it leans on, so I had to tweak the cropping code a bit.

For scrolling and filtering the crops, I added a row to an SQLite database for every image.
This row consists of:
  • meta information about the image to filter and facet on

  • a thumbnail that can be displayed with datasette-render-images installed

  • the cropped and contrast enhanced display image

Rough unoptimized code that solves my current issue:

 import datetime
 import io
 from pathlib import Path

 import cv2
 from sqlite_utils.db import Database

 def find_and_crop(image):
     # cut center
     image = image[300:1500, 500:1800]

     # rotate (simplification; actual version has code to correct skewness)
     height, width, channels = image.shape
     center = (width / 2, height / 2)
     angle = 87
     M = cv2.getRotationMatrix2D(center, angle, 1)
     image = cv2.warpAffine(image, M, (height, width))

     # greyscale
     gray = cv2.cvtColor(image.copy(), cv2.COLOR_BGR2GRAY)
     gray = cv2.blur(gray, (11, 11))
     thresh = cv2.threshold(gray, 70, 255, cv2.THRESH_BINARY)[1]

     contours, hierarchy = cv2.findContours(thresh, 1, 2)
     for cnt in contours:
         x, y, w, h = cv2.boundingRect(cnt)
         if w > 200 and w < 450 and h > 100 and h < 250:
             break
     else:
         # no rectangle was found
         return {}

     # crop image and increase brightness
     cropped = image[y : y + h, x : x + w]
     contrast = cv2.convertScaleAbs(cropped, alpha=3, beta=0)
     return {
         "h": h,
         "w": w,
         # imencode returns a tuple: is_success, image
         "display_image": io.BytesIO(cv2.imencode(".jpg", contrast)[1]).getbuffer(),
     }

 def thumbnail(image, width = 200):
     (h, w) = image.shape[:2]
     image = cv2.resize(image, (width, int(h * width / float(w))), interpolation=cv2.INTER_AREA)
     return io.BytesIO(cv2.imencode(".jpg", image)[1]).getbuffer()


 db = Database("minol.db")
 img_table = db["images"]
 img_table.create(
     {
         "id": str,
         "filename": str,
         "h": int,
         "w": int,
         "date": str,
         "year": int,
         "month": int,
         "day": int,
         "thumbnail": str,
         "display_image": str,
     },
     pk="id",
     transform=True,
)

for filename in Path("images").glob("202*/*/*jpg"):
    print(filename)
    ts = filename.stem
    dt = datetime.datetime.utcfromtimestamp(int(ts))
    image = cv2.imread(str(filename))
    img_table.upsert(
        {
            "id": ts,
            "filename": str(filename),
            "date": dt,
            "year": dt.year,
            "month": dt.month,
            "day": dt.day,
            "thumbnail": thumbnail(image),
            **find_and_crop(image),
        },
        pk="id",
    )

The script is detecting the display on the photo, cropping the display and saving everything to an sqlite table.

Example from my actual table:

/images/datasette-minol.png

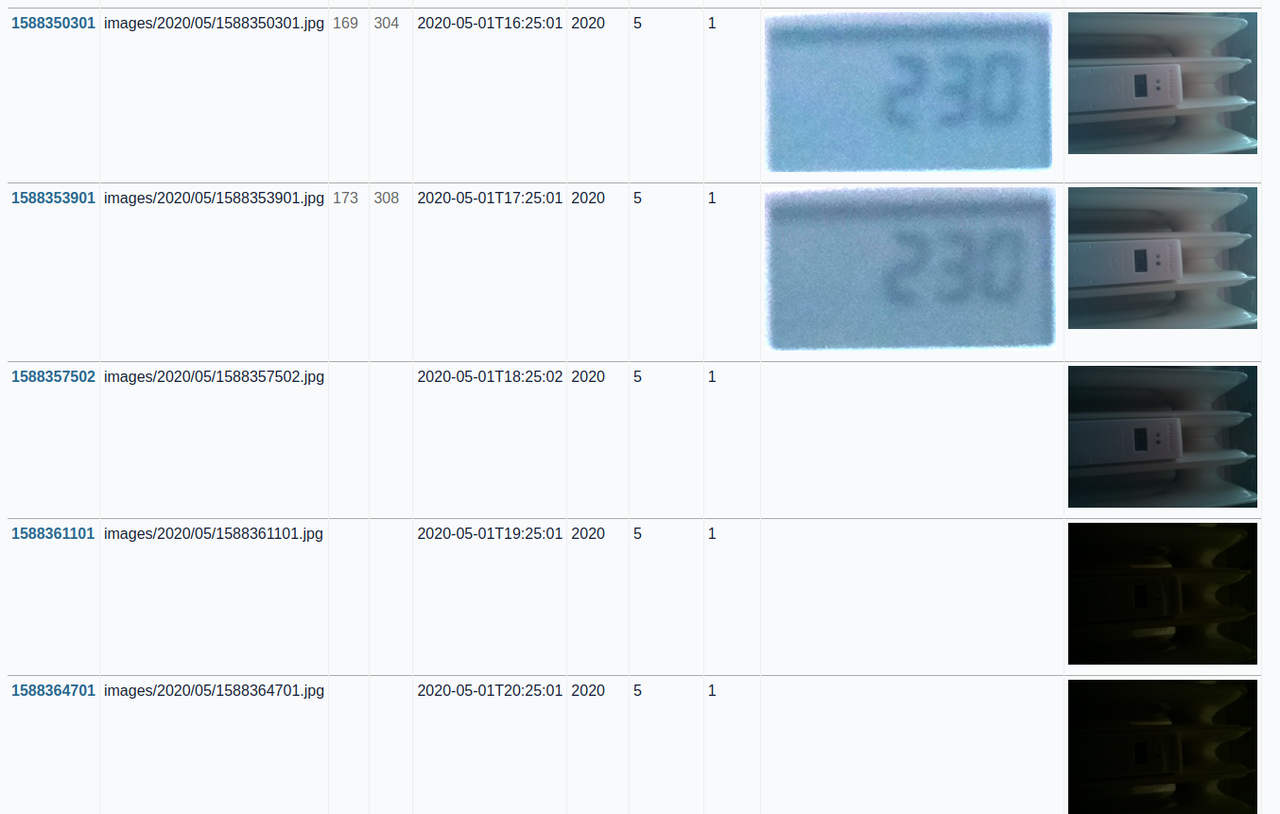
Photos shot at night are too dark to crop the display, so they have no display image. To get a consistent data curve later one image a day is enough, but because of the angle of the sun and reflections the best image can be at different times.

Adding a Favicon

After more than 15 years of running this blog it is time to add a favicon. Of course I could start Gimp and create one or I could even use some of the Webeditors out there, but I want to do this in Python. It doesn't have to be beautiful. My usecase here is: I want to find my blog in all the open Browser tabs I have.

I decided on using Pillow in a Jupyter Notebook to generate a background color gradient and the letter M.

The code I used for the gradient:

from PIL import Image

def gradient_image(col1: str, col2: str, width: int, angle: int) -> Image:
    base_image = Image.new("RGB", (width, width), col1)
    top_image = Image.new("RGB", (width, width), col2)
    mask = Image.new("L", (width * 2, width * 2))

    # generate a mask to blend the top image over the base image
    data = []
    for y in range(width * 2):
        data.extend(width * [int(90 * (y / width))])

    mask.putdata(data)
    # rotate mask to get a rotated gradient and crop to image size
    mask = mask.rotate(angle).crop((0, 0, width, width))
    base_image.paste(top_image, (0, 0), mask)
    return base_image

This generates two images with col1 and col2 and generates a mask with transparency gradients. Then it rotates the mask (only angles between 0 and 90 are allowed) and applies the mask with the top image on top of the base image. The gradient for the angles 0 to 90 in 10 degree steps look like this:

img1

And the code to add the "M" on top:

from PIL import Image, ImageFont, ImageDraw

# image with blue/yellow gradient
im = gradient_image("lightblue", "yellow", 32, 42)
# the font
font = ImageFont.truetype("/usr/share/fonts/gnu-free/FreeMono.otf", 40)
# add black non transparent M to image
draw = ImageDraw.Draw(im)
draw.text((4, -4), "M", font=font, fill=(0, 0, 0, 255))
# save as icon
im.save("favicon.ico")

The resulting Icon:

img2

is good enough for my usecase. :)

Selfhost OpenRouteService API

After last weeks overpass api selfhost, this week it is selfhosting openrouteservice. They have a ready to modify docker-compose.yml and good documentation for Docker hosting. Maybe a bit too many options and too many choices for someone hosting this the first time.

As last week we will use a Hetzner VPS, I used the same CX32 with 4 cores, 8 GB memory and 80GB disk to start with (and later a CX42 for more memory). Again I used Debian 12 as operating system.

The 8GB of memory are not enough so we create a swapfile with additonal 8GB of memory:

fallocate -l 8G /swapfile
chmod 600 /swapfile
mkswap /swapfile
swapon /swapfile
swapon --show

Then I installed Docker Engine.

My modified docker-compose.yml is stripped of everything I don't need: removing car-routing and adding walking. I downloaded baden-wuerttemberg-latest.osm.pdf from Geofabrik and put it into a freshly created ors-docker/files/ folder.

---
services:
  ors-app:
    build:
      context: ./
    container_name: ors-app
    ports:
      - "80:8082"  # Expose the ORS API on port 80
      - "9001:9001"
    image: openrouteservice/openrouteservice:v8.0.0
    volumes:
      - ./ors-docker:/home/ors
    environment:
      REBUILD_GRAPHS: False
      CONTAINER_LOG_LEVEL: INFO
      XMS: 4g  # start RAM assigned to java
      XMX: 10g  # max RAM assigned to java. Rule of Thumb: <PBF-size> * <profiles> * 2
      # Example: 1.5 GB pbf size, two profiles (car and foot-walking)
      # -> 1.5 * 2 * 2 = 6. Set xmx to be AT LEAST `-Xmx6g`
      ADDITIONAL_JAVA_OPTS: ""  # further options you want to pass to the java command
      ors.engine.source_file: /home/ors/files/baden-wuerttemberg-latest.osm.pbf
      ors.engine.profiles.car.enabled: false
      ors.engine.profiles.walking.enabled: true

Then run everything with docker compose up. This took a while. Especially the elevation cache and graph building.

I later tried the pbf for the United States (10GB) which needed more memory (I used a bigger instance with 16Gb of memory and 16GB of swap, and it took more than 7 hours to preprocess.

When the preprocessing is finished, the status page (http://<IP-ADDRESS>/ors/v2/status) for me looked like this:

{
  "languages": [
    "cs", "cs-cz", "de", "de-de", "en", "en-us", "eo", "eo-eo", "es", "es-es", "fr", "fr-fr", "gr", "gr-gr",
    "he", "he-il", "hu", "hu-hu", "id", "id-id", "it", "it-it", "ja", "ja-jp", "nb", "nb-no", "ne", "ne-np",
    "nl", "nl-nl", "pl", "pl-pl", "pt", "pt-pt", "ro", "ro-ro", "ru", "ru-ru", "tr", "tr-tr", "zh", "zh-cn"
  ],
  "engine": {"build_date": "2024-03-21T13:55:54Z", "version": "8.0.0"},
  "profiles": {
    "profile 1": {
      "storages": {
        "HillIndex": {"gh_profile": "pedestrian_ors_fastest"},
        "WayCategory": {"gh_profile": "pedestrian_ors_fastest"},
        "WaySurfaceType": {"gh_profile": "pedestrian_ors_fastest"},
        "TrailDifficulty": {"gh_profile": "pedestrian_ors_fastest"}
      },
      "profiles": "foot-walking",
      "creation_date": "",
      "limits": {
        "maximum_distance": 100000,
        "maximum_waypoints": 50,
        "maximum_distance_dynamic_weights": 100000,
        "maximum_distance_avoid_areas": 100000
      }}},
  "services": ["routing", "isochrones", "matrix", "snap"]
}

Same as last week an example for how to use the API. I only needed the routing for a walking distance and duration estimation. As example we will route from the Empire State building in New York to the center of Central Park. The coordinates are: 40.748448,-73.985630 to 40.782773,-73.965363 (both lat,lon).

import httpx

r = httpx.get(
    "http://<IP-ADDRESS>/ors/v2/directions/foot-walking",
    params={
        # here it is lon,lat
        "start": "-73.985630,40.748448",
        "end": "-73.965363,40.782773",
    },
)
print(r.json()["features"][0]["properties"]["summary"])

This returns {'distance': 4421.3, 'duration': 3183.2}, so 4.4 km and 53 minutes. I compared this to Google Maps Routing and it is in the same ballpark.